使用Prometheus和Grafana监控网站
该指南会首先在 UbuntU20.04上安装Apache2, 然后部署一个 Wordpress 站点到 Apache2服务器上,最后通过 Prometheus 监控该Wordpress网站的状态并使用 Grafana 面板展示。
安装Wordpress
安装Apache
sudo apt update
sudo apt install apache2
查看 Apache运行状态:
sudo systemctl status apache2
输出如下内容说明Apache正在运行:

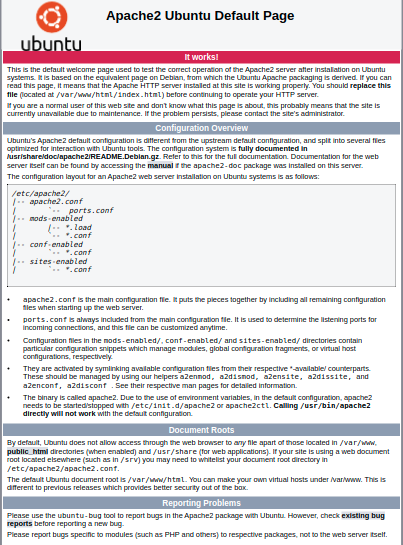
在浏览器中访问 localhost 显示如下说明 Apache工作正常:
安装Mysql
sudo apt install mysql-server
查看Mysql运行状态,如下所示,说明Mysql已经安装成功:

配置Mysql:
sudo mysql_secure_installation
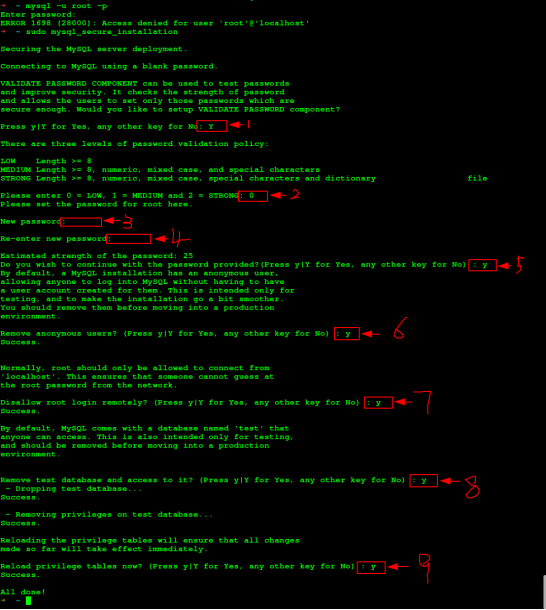
上边每个步骤的输入:
- Y
- 0
- abc1234
- abc1234
- Y
- Y
- Y
- Y
- Y
刚才我们完成了Mysql的安装和一些基本配置,接下来我们为wordpress配置数据库环境。
为Wordpress创建数据库
在命令行中,使用root用户登录Mysql:
sudo mysql -u root -p
CREATE DATABASE wpdb DEFAULT CHARACTER SET utf8 COLLATE utf8_unicode_ci;
CREATE USER 'wpuser'@'localhost' IDENTIFIED BY 'WP&Password123';
GRANT ALL ON wpdb.* TO 'wpuser'@'localhost';
GRANT ALL PRIVILEGES ON wpdb.* TO 'wpuser'@'localhost';
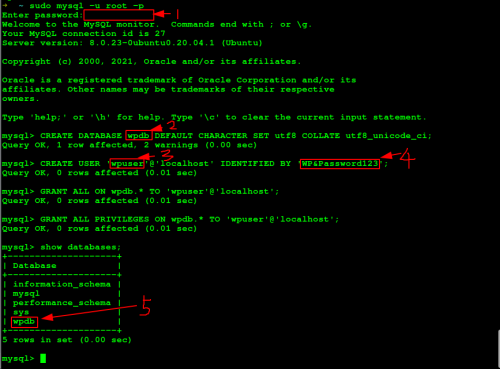
- 输入上面配置Mysql过程中第三步骤设置的 root 密码
- 创建数据库wpdb ,后边安装wordpress将使用
- 创建用户wpuser,
- 密码设置为 WP&Password123
- 查看wpdb数据库已经创建成功
最后更新变更:
FLUSH PRIVILEGES;
安装PHP
sudo apt install php -y
sudo apt install libapache2-mod-php -y
sudo apt install php-mysql -y
sudo apt install php-curl php-gd php-xml php-mbstring  php-xmlrpc php-zip php-soap php-intl -y
然后我们需要重启一下 apache2:
sudo systemctl restart apache2
部署Wordpress
curl -O https://wordpress.org/latest.tar.gz
tar -xvf latest.tar.gz
mv wordpress/wp-config-sample.php wordpress/wp-config.php
sudo cp -a wordpress/. /var/www/html
sudo chown -R www-data /var/www/html
sudo sed -i 's#database_name_here#wpdb#g' /var/www/html/wp-config.php
sudo sed -i 's#username_here#wpuser#g' /var/www/html/wp-config.php
sudo sed -i 's#password_here#WP\&Password123#g' /var/www/html/wp-config.php
sudo rm /var/www/html/index.html
然后在浏览器输入 localhost :
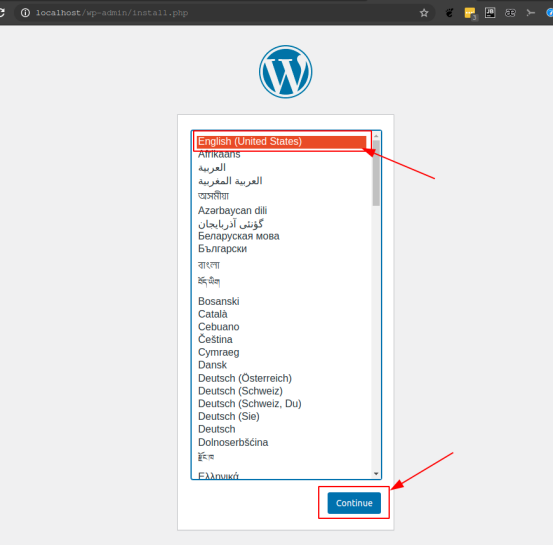
选择界面语言,然后点击继续
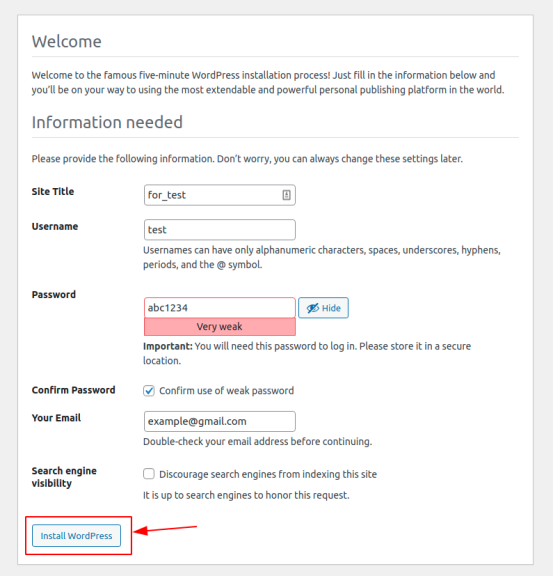
设置博客标题,创建一个用户,需要输入用户名和密码以及邮箱地址。然后点击安装 WordPress

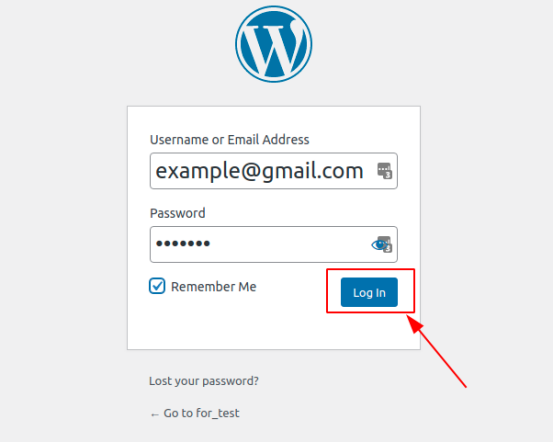
安装wordpress成功,点击登录。这是Wordpress的控制面板:
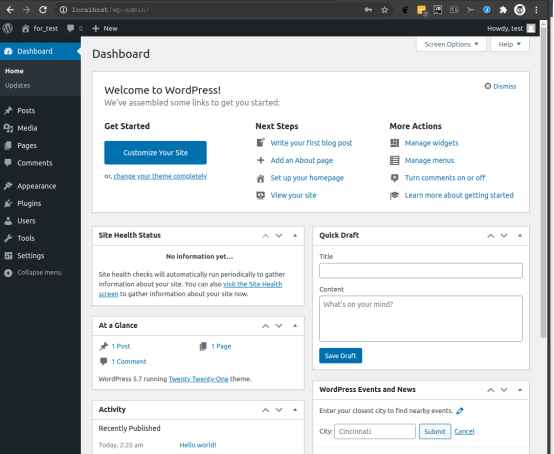
Wordpress网站主页 localhost:

安装Prometheus
1. 创建Prometheus系统组
sudo groupadd --system prometheus
sudo useradd -s /sbin/nologin --system -g prometheus prometheus
2. 创建Prometheus的数据和配置目录
sudo mkdir /var/lib/prometheus
for i in rules rules.d files_sd; do sudo mkdir -p /etc/prometheus/${i}; done
3. 下载Prometheus
curl -s https://api.github.com/repos/prometheus/prometheus/releases/latest | grep browser_download_url | grep linux-amd64 | cut -d '"' -f 4 | wget -qi -
tar xvf prometheus*.tar.gz
cd prometheus*/
sudo mv prometheus promtool /usr/local/bin/
4. 移动Prometheus的配置模板到/etc目录
sudo mv prometheus.yml /etc/prometheus/prometheus.yml
sudo mv consoles/ console_libraries/ /etc/prometheus/
5. 创建Prometheus的systemd服务文件
sudo tee /etc/systemd/system/prometheus.service<<EOF
[Unit]
Description=Prometheus
Documentation=https://prometheus.io/docs/introduction/overview/
Wants=network-online.target
After=network-online.target

[Service]
Type=simple
User=prometheus
Group=prometheus
ExecReload=/bin/kill -HUP \$MAINPID
ExecStart=/usr/local/bin/prometheus \
  --config.file=/etc/prometheus/prometheus.yml \
  --storage.tsdb.path=/var/lib/prometheus \
  --web.console.templates=/etc/prometheus/consoles \
  --web.console.libraries=/etc/prometheus/console_libraries \
  --web.listen-address=0.0.0.0:9090 \
  --web.external-url=

SyslogIdentifier=prometheus
Restart=always

[Install]
WantedBy=multi-user.target
EOF
修改目录权限
for i in rules rules.d files_sd; do sudo chown -R prometheus:prometheus /etc/prometheus/${i}; done
for i in rules rules.d files_sd; do sudo chmod -R 775 /etc/prometheus/${i}; done
sudo chown -R prometheus:prometheus /var/lib/prometheus/
重新加载systemd daemon 并启动服务:
sudo systemctl daemon-reload
sudo systemctl start prometheus
sudo systemctl enable prometheus
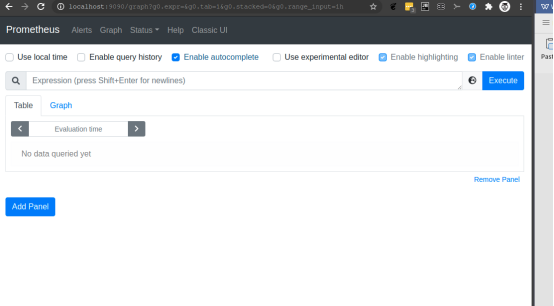
在浏览器中访问 localhost: 9090 :
安装prometheus-blackbox-exporter
apt -y install prometheus-blackbox-exporter
systemctl enable prometheus-blackbox-exporter
配置prometheus监控wordpress站点
sudo tee /etc/prometheus/prometheus.yml<<EOF
global:
  scrape_interval: 15s
  evaluation_interval: 1m

rule_files:
  - /etc/prometheus/rules/*.yml

scrape_configs:
  - job_name: 'website-monitoring-http'
    metrics_path: /probe
    params:
      module: [http_2xx]
    static_configs:
      - targets:
        # hostname or IP address of target Host
        - localhost:80
    relabel_configs:
      - source_labels: [__address__]
        target_label: __param_target
      - source_labels: [__param_target]
        target_label: instance
      - target_label: __address__
        replacement: localhost:9115

  - job_name: "website-monitoring-icmp"
    metrics_path: /probe
    params:
      module: [icmp]
    static_configs:
      - targets:
        # hostname or IP address of target Host
        - localhost:80
    relabel_configs:
      - source_labels: [__address__]
        target_label: __param_target
      - source_labels: [__param_target]
        target_label: instance
      - target_label: __address__
        replacement: localhost:9115
EOF
重新启动prometheus:
sudo systemctl restart prometheus.service
安装 Grafana
sudo apt-get install -y apt-transport-https
sudo apt-get install -y software-properties-common wget
wget -q -O - https://packages.grafana.com/gpg.key | sudo apt-key add -
echo "deb https://packages.grafana.com/oss/deb stable main" | sudo tee -a /etc/apt/sources.list.d/grafana.list
sudo apt update
sudo apt-get install grafana
sudo systemctl daemon-reload
sudo systemctl enable grafana-server
sudo systemctl start grafana-server
在浏览器输入 localhost: 3000

username: admin password: amin

会自动要求重置密码:我这里设置的新密码为: abc1234

Grafana 安装成功。
1. 添加数据源
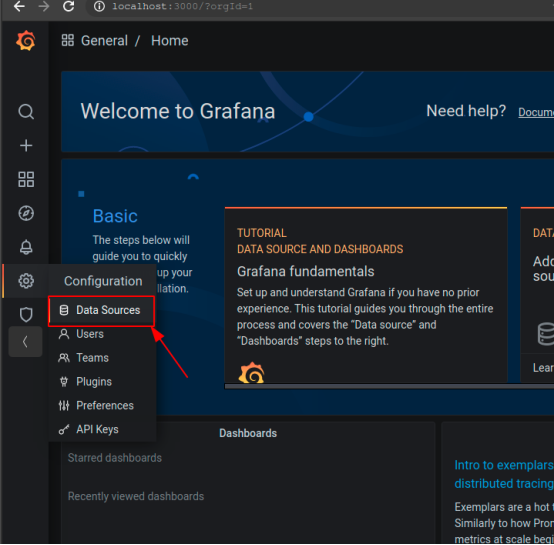
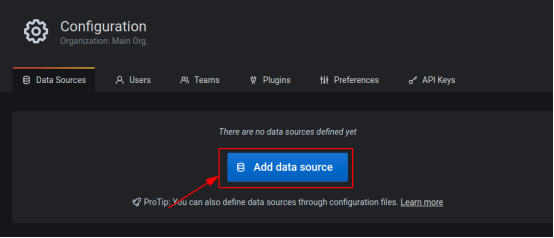
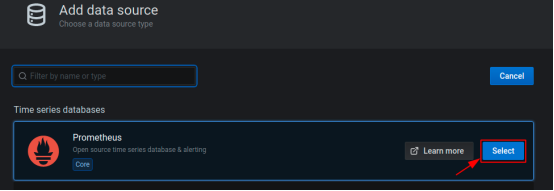
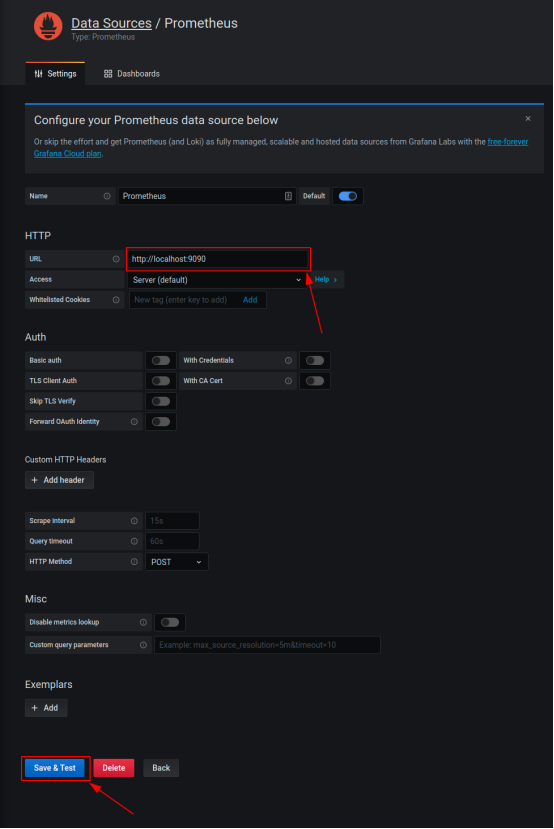

添加 Prometheus数据源成功。
2. 导入面板:
这里我们使用面板 https://grafana.com/grafana/dashboards/13041 ,该面板的ID 为 13041
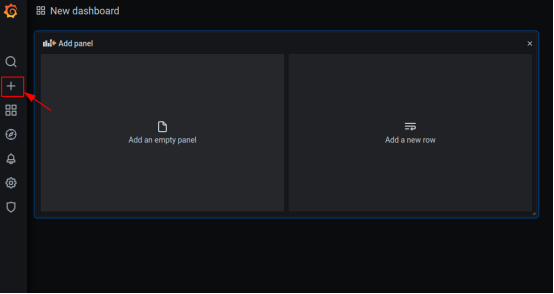
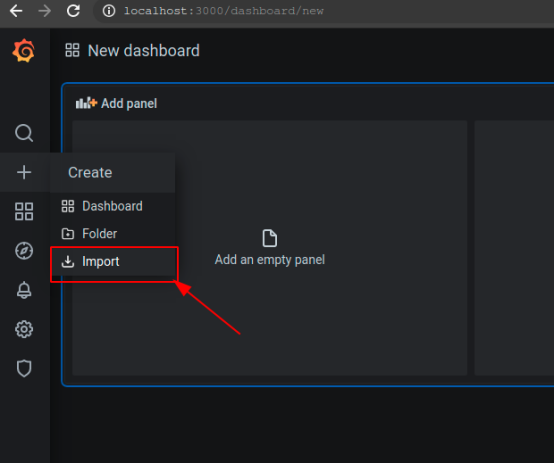
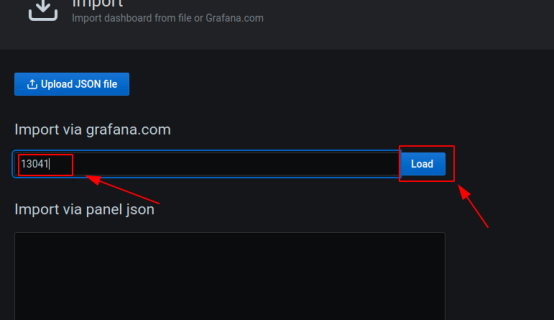
在第一个输入框输入面板 ID,然后加载
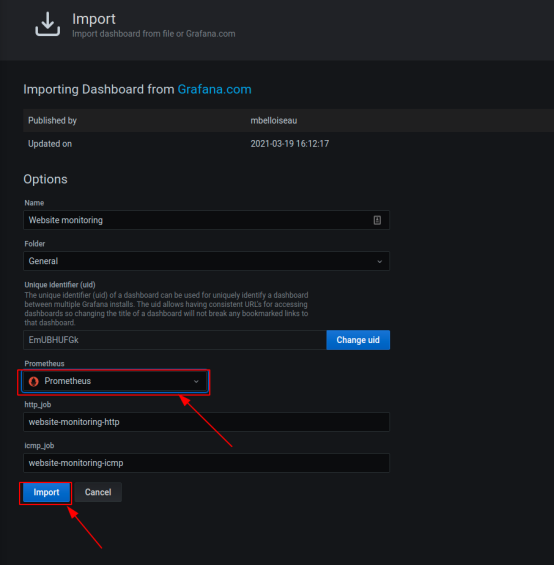
选择我们刚添加的数据源,然后点击导入。
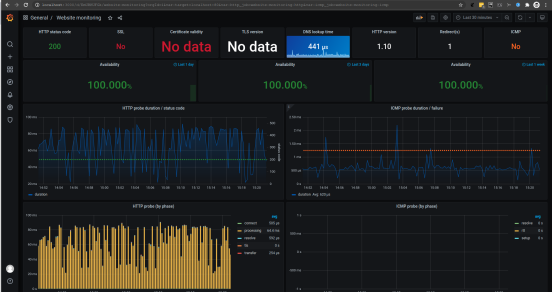
完成,可以看到面板正在监控我们刚刚创建的 Wordpress 站点。