Ubuntu 16.04 安装 fastdfs-nginx-module 模块
在安装 fastdfs-nginx-module 模块之前,首先确定你的环境中已经成功安装了 nginx(源码安装) 与 fastdfs, 如果还没有安装, 请按照我写的其他两篇文章 Ubuntu 16.04 安装 Nginx(源码) 与 Ubuntu 16.04 下部署 FastDFS 5.08 完成安装然后再返回来继续.
由于 nginx 添加新模块需要重新编译, 所以需要知道你的 nginx 源码目录在哪里, 我的 nginx 源码目录为:
➜  nginx-1.13.0 pwd
/home/huoshan/software/nginx-1.13.0
下载 fastdfs-nginx-module
fastdfs-nginx-module 安装包可以在这里下载: https://sourceforge.net/projects/fastdfs/files/FastDFS Nginx Module Source Code/ 我选择目前最新的版本 1.16.targ.gz . 也可以通过命令行下载:
wget https://sourceforge.net/projects/fastdfs/files/FastDFS%20Nginx%20Module%20Source%20Code/fastdfs-nginx-module_v1.16.tar.gz
添加 fastdfs-nginx-module
先解压 fastdfs-nginx-module_v1.16.tar.gz
tar -xvf fastdfs-nginx-module_v1.16.tar.gz
查看现在 nginx 已经安装了哪些模块
/usr/local/nginx/sbin/nginx -V

config arguments: 后边就是 nginx 已经安装的模块, 由于我之前已经安装了 fastdfs-nginx-module 所以有 --add-module=/home/huoshan/software/fastdfs-nginx-module/src , 你的设备上打印出来应该是没有这段的.
接下来将 fastdfs-nginx-module 编译到 nginx 中, 进入到 nginx 源码目录 /home/huoshan/software/nginx-1.13.0
执行脚本 configure 后加之前安装的所有模块(也就是上边打印出来的 configure arguments: 后边所有) 再添加 fastdfs-nginx-module 作为参数
cd /home/huoshan/software/nginx-1.13.0
./configure --prefix=/usr/local/nginx --with-http_ssl_module --add-module=/home/huoshan/software/fastdfs-nginx-module/src
Note:
- –prefix=/usr/local/nginx --with-http_ssl_module 是之前 nginx 已经安装的模块
- –add-module=/home/huoshan/software/fastdfs-nginx-module/src 是我们要添加的新模块
重新编译Nginx
在 /home/huoshan/software/nginx-1.13.0 目录下:
make
执行该步骤有可能遇到如下编译错误:
In file included from /home/free/fastdfs-nginx-module/src/ngx_http_fastdfs_module.c:6:0:
/home/free/fastdfs-nginx-module/src/common.c:21:10: fatal error: fdfs_define.h: 没有那个文件或目录
#include "fdfs_define.h"
^~~~~~~~~~~~~~~
compilation terminated.
objs/Makefile:1236: recipe for target 'objs/addon/src/ngx_http_fastdfs_module.o' failed
make[1]: *** [objs/addon/src/ngx_http_fastdfs_module.o] Error 1
make[1]: 离开目录“/home/free/nginx-1.15.2”
Makefile:8: recipe for target 'build' failed
make: *** [build] Error 2
解决方法:创建以下软连接
ln -sv /usr/include/fastcommon /usr/local/include/fastcommon
ln -sv /usr/include/fastdfs /usr/local/include/fastdfs
ln -sv /usr/lib64/libfastcommon.so /usr/local/lib/libfastcommon.so
重新 make 编译即可.
Note:
- 别执行 make install ,这样会覆盖掉之前 nginx 的安装.
备份旧 Nginx
cp /usr/local/nginx/sbin/nginx /usr/local/nginx/sbin/nginx.old
新 Nginx 覆盖旧 Nginx
在 Nginx 源码目录下执行:
cp objs/nginx /usr/local/nginx/sbin/nginx
文件配置
复制 fastdfs-nginx-module 下配置 mod_fastdfs.conf 到 FastDFS 配置路径 /etc/fdfs/
cp src/mod_fastdfs.conf /etc/fdfs/
修改 /etc/fdfs/mod_fastdfs.conf 配置项:
base_path=/opt/fastdfs  #日志基路径
tracker_server=192.168.31.152:22122 #tracker server 地址
store_path0=/opt/fastdfs/storage  #数据存储路径
url_have_group_name = true #文件url是否包含 group name,默认为 false
复制 FastDFS 源码目录下(安装 FastDFS 时下载压缩包中) http.conf mime.types 到 /etc/fdfs
在源码路径下子路径 conf 中执行
cp http.conf mime.types /etc/fdfs/
OK, fastdfs中配置完成.
接下来在 Nginx 中配置.
在 http 中添加一个 server:
server {
 listen       80;
 server_name  localhost;

 #charset koi8-r;

 #access_log  logs/host.access.log  main;

 location ~ /group([1-9])/M00{
 ngx_fastdfs_module;
 }

 location / {
 root   html;
 index  index.html index.htm;
 }

 #error_page  404              /404.html;

 # redirect server error pages to the static page /50x.html
 #
 error_page   500 502 503 504  /50x.html;
 location = /50x.html {
 root   html;
 }
}
重新加载下 Nginx 配置:
/usr/local/nginx/sbin/nginx -s reload
OK, 配置完成.
测试
启动下 tracker 与 storage
/usr/bin/fdfs_trackerd /etc/fdfs/tracker.conf
/usr/bin/fdfs_storaged /etc/fdfs/storage.conf
如果 Nginx 没有启动, 也启动下
/usr/local/nginx/sbin/nginx
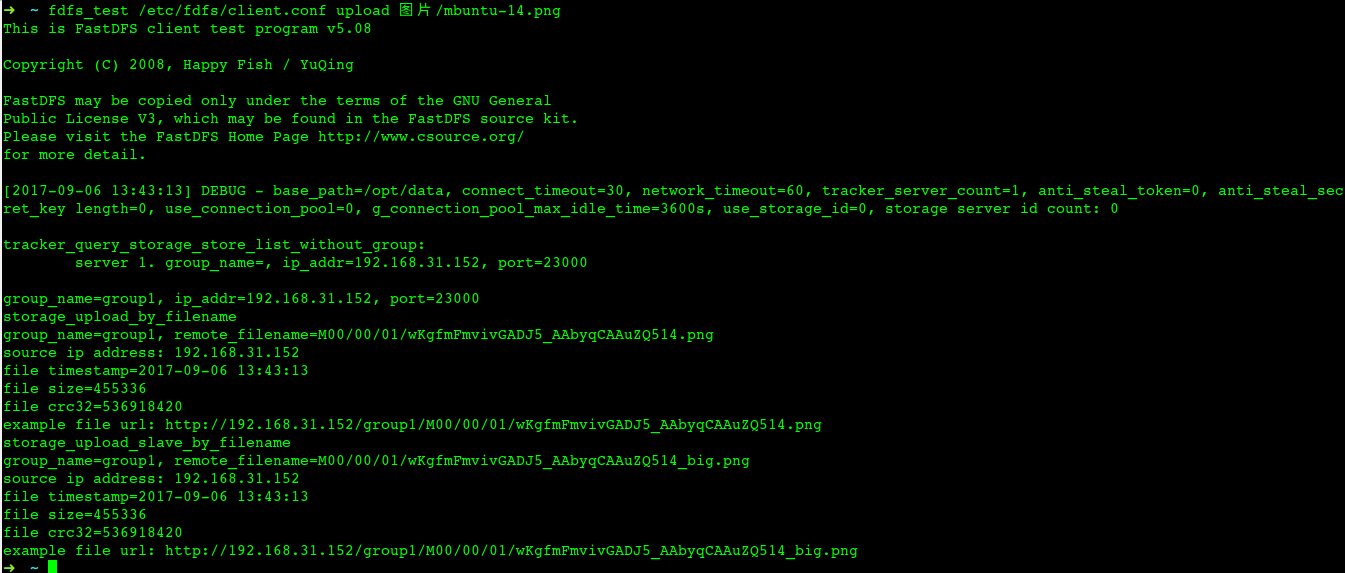
然后使用 fdfs_test 上传一个文件:

可以看到返回一个 example file url, 在浏览器中打开它
